Thursday, March 31, 2016

XAVC and DaVinci Resolve Lite: Import and Edit XAVC with DaVinci Resolve Lite

I have the latest version of Resolve Lite. From what I understand people have been using Resolve Lite to view 4K XAVC footage and transcode to 1920x1080 Pro Res. I realise that in order for 4K XAVC colour correction I must purchase a full license of Resolve. My question is in regards to Resolve handling the 4K XAVC playback. Does anyone else have problems getting smooth playback in Resolve Lite? Is it because this is Resolve lite that it won't allow full speed playback of 4K XAVC?


Note that you can use the FREE version of Davinci Resolve Lite to open 2k or 4k files with the only limitation being that it can not output higher than HD resolution files. You’d need the full paid version of Davinci Resolve Lite to go higher than HD, but this is still a great option for those looking to wrangle out some files from their 4K XAVC files.

For editing the 4K XAVC with DaVinci Resolve Lite, you should check for your Mac or Windows computer environments below:

Minimum system requirements for Mac:
  • Mac OS X 10.8.5 Mountain Lion
  • 12 GB of system memory is recommended and 8 GB is the minimum supported
  • Blackmagic Design Desktop Video version 10.1.1 or later
  • CUDA Driver version 6.5.45
  • NVIDIA Driver version – As required by your GPU
  • RED Rocket-X Driver 2.1.19.0 and Firmware 1.3.19.7 or later
  • RED Rocket Driver 1.4.36.0 and Firmware 1.1.17.3 or late
Minimum system requirements for Windows:
  • Windows 7 Pro 64 bit with SP1
  • 12 GB of system memory is recommended and 8 GB is the minimum supported
  • Blackmagic Design Desktop Video version 10.1.1 or later
  • NVIDIA/AMD Driver version – As required by your GPU
If your Mac or Windows computer environments over the requirements list above, you can get the full version of Davinci Resolve Lite and can be edit the 4K XAVC what you want, if your computer requirements under that, or your computer over the requirements of that but edit the 4K XAVC files unsmoothly, you’d better transcode the 4K XAVC files to the Davinci Resolve Lite compatible format or downscale the 4K XAVC to a lower resolution such as 1080p Avid DNxHD or 720p Avid DNxHD.

To convert 4K XAVC to Davinci Resolve Lite easily and quickly, Pavtube Video Converter for Mac (Best XAVC/XAVC S Video Converter for Mac Review) is highly recommended. This program features high efficiency and seamless conversion. With it, you can transcode 4K XAVC to Davinci Resolve Lite compatible video(QuickTime, ProRes, Avid DNxHD is well supported by this powerful editing system) with original quality. Besides, this software can also transcode 4K XAVC files for editing in Final Cut Pro 7/X, iMovie, Avid Media Composer, Adobe Premiere Pro, etc NLEs. 

If you are running on Windows, please get Pavtube Video Converter.

The trail-before-purchase is supported, just feel free to try it:


Key Features:
  • Three simple clicks to convert 4K XAVC videos to Davinci Resolve Lite compatible formats.
  • Aside from Davinci Resolve Lite, you can directly convert 4K XAVC to iMovie, QuickTime, Windows Movie Maker and more video editors supported formats without additional settings.
  • Edit your 4K XAVC videos before converting them. With the built-in editor, you can trim or crop your videos. And you are able to add subtitles and watermarks to the videos as well.
  • Perfectly compatible with Mac OS X 10.11 El Capitan, 10.10 Yosemite, 10.9 Mavericks, 10.8 Mountain Lion, 10.7 Lion and 10.6 Snow Leopard.
Note: The conversion speed is very fast because it supports batch conversion and NVIDIA CUDA & ATI Stream (AMD APP) acceleration technologies. It converts multiple video clips at the same time, moreover it can shut down computer after the process is complete, so run the app overnight and you could enjoy the created videos next morning when you are up.

Install and run it, you will see the interface. The following is a simple instruction of how to use this Pavtube Video Converter for Mac: 

How to Convert and Import 4K XAVC Files to Davinci Resolve Lite

Step 1. Add 4K XAVC files

Click "Add Video" button to load .mts files to the program. You can also directly drag the video files into the program directly.


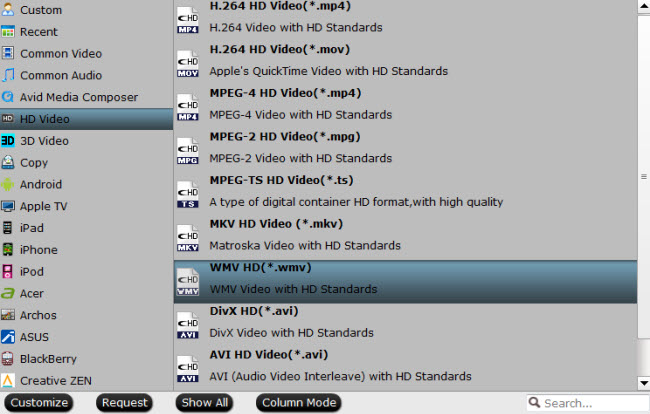
Step 2. Select output format

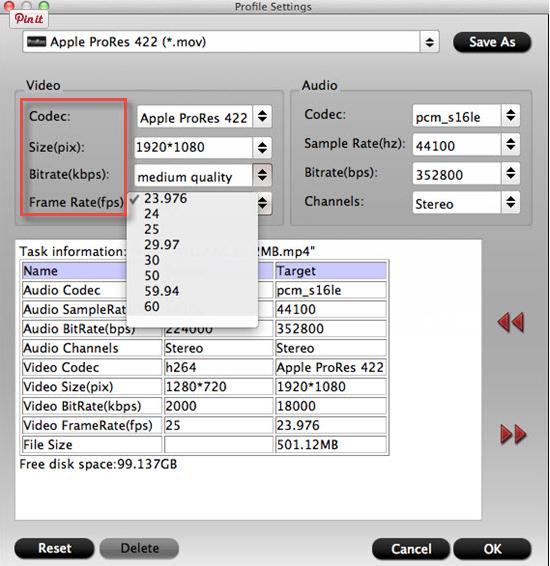
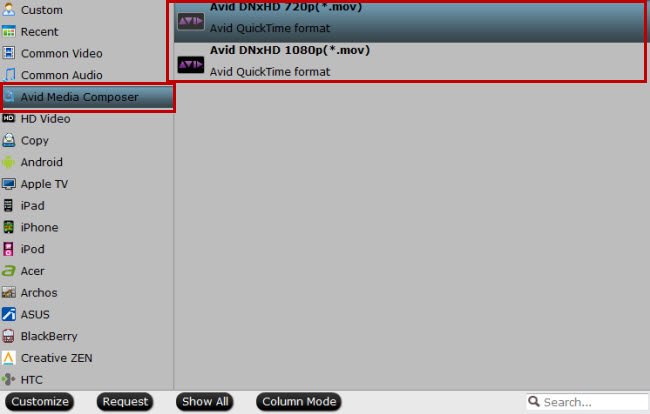
As is mentioned above, Avid DNxHD is well supported by Davinci Resolve Lite. So just click the format bar to follow “Avid Media Compose” > “Avid DNxHD 720p (*.mov)” or “Avid DNxHD 1080p (*.mov).”


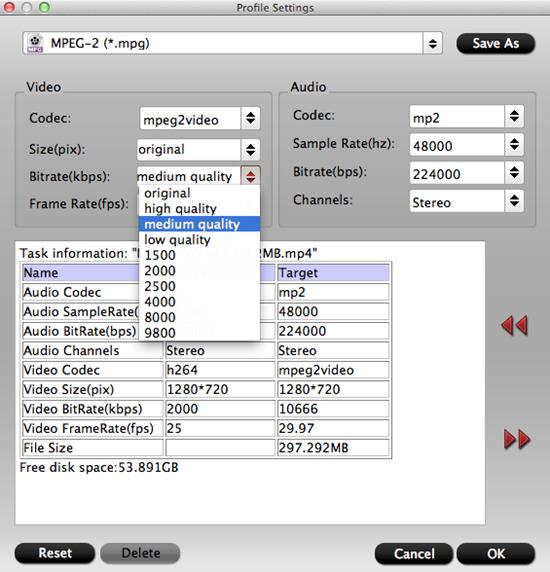
Tip: If you like, adjust video and audio parameters, including the Bitrate of Video and Audio, the Codec of Video and Audio, Video Size, Sample Rate, Frame Rate, Audio Channels, etc., by clicking the Settings button on the main interface for getting the best quality.


Step 3. Start the conversion

Finally, simply hig the big Convert button to start converting 4K XAVC to Davinci Resolve Lite friendly video formats. 

Within several minutes, you can find the converted file on your computer by clicking the "Open" button. And then you can import the converted files to Davinci Resolve Lite easily.

Read More:

Sunday, March 20, 2016

Get $9.9 HD/3D/4K Video Converter on Pavtube Facebook Spring Deals

Pavtube Software, the industry leader in the field of Blu-ray & DVD backup and HD/4K/3D Video solutions, rolls out its Spring Promotion of 2016 on Facebook, offering up to a 78% deep discount on many of its hot selling Video products and up to 50% deep discount on many of its hot selling Blu-ray/DVD products, including No.1 bestseller ByteCopy, No.2 bestseller Video Converter Ultimate... as a gift. Pavtube Software could be everything a movie lover may need to back up their physical DVD and Blu-ray discs, convert them into on-demand formats for enjoying on the move.

Giveaway: First Five customers can share this page to your timeline, email us your order numer and the snapshot to win one more FREE license, no product limit!

If you have any problem to buy or use Pavtube, pls feel free to contact support@pavtube.com or 
macsupport@pavtube.com

Note: The main products of Pavtube that improved Blu-ray/DVD ripping & video converting speed with GPU acceleration are BDMagic, ByteCopy, Video Converter Ultimate, DVDAid, Video Converter and so on.

No.1 Bestseller Pavtube HD Video Converter for Windows/Mac - Only $9.9

Key Features
- HD Video Converter + 4K Video Converter + 3D Video Converter + Audio Converter
- Convert All Popular HD Video and Audio Formats
- Support H.265/HEVC Encoding and Decoding
- Support Transcoding HD/4K Videos from all Camcorders & Cameras: Sony, Canon, Panasonic, Samsung, GoPro, Blackmagic, JVC, Nikon, DJI and more
- Export Apple ProRes/DVCPRO/HDV/Avid DNxHD/AIC/MPEG-2 for NLEs
- Support Presets for Almost All Popular Devices, game consoles, media players/servers, TVs, projector, VR headsets and more
- Support Batch Conversion with Fast Speed and Excellent Quality
- Edit Videos through Trimming, Cropping, Adding Watermarks, Insert Subtitles, etc.
- Support adding .srt/.ass/.ssa subtitles into any videos

Pavtube HD Video Converter for Mac Review
Best HD Video Converter Review
Top 5 Best HD Video Converter for Mac Review


No.2 Bestseller Pavtube Video Converter for Windows/Mac - Only $9.9

Key Features
- Convert from and to any common SD/HD/3D/4K video and audio format.
- Support Decoding and Encoding H.265/HEVC and XAVC 4K video
- Support Encode any videos to M3U8 for Apple devices 
- 150+ ready presets for iPhone, iPad, Apple TV, Samsung, Google, TV, Surface, PS4, PS3, Xbox, WDTV and other mobile devices
- Support Apple ProRes/DVCPRO/HDV/Avid DNxHD/AIC encoding.
- Output Formats for Windows or Mac editing software, e.g. FCP X, iMovie, FCE, Avid, Adobe Premiere, Eduis Pro, GoPro Studio, WIndows Movie Maker, Sony Vegas Pro...

- 6X faster conversion speed and high output quality
- Support batch conversion - convert multiple files at the same time
- Edit and touch up your video in clicks (e.g. trimming, cropping, inserting SRT/ASS/SSA subtitle, etc)

Top 10 Video Converter Review
Top 4 Video Converter for Mac Review


No.3 Bestseller Pavtube multi-track MXF Converter for Windows/Mac - Only $9.9

Key Features
- Export MXF into MKV, MOV, and MP4 container with multiple audio tracks preserved
- Output multi-track Apple Prores MOV for further editing in Final Cut Pro (X)
- Mix multiple audio tracks/channels in MXF footage into one
- Make MXF files editable in mainstream video editing applications
- Convert MXF to any other formats for editing, playing, or broadcasting
- Convert 2D videos to 3D in MKV, MOV, AVI, MP4, WMV formats
- Support DVCPRO/HDV/Avid DNxHD/AIC output
- Import/preserve/mix multi-track MXF in MKV/MP4/MOV formats
- Merge/split/trim/crop MXF footages.

Best Multi-track MXF Converter Review
Pavtube iMixMXF vs Tipard MXF Converter for Mac
Top 5 Best MXF Converters for Mac


For more products of Pavtube Spring Promotion 2016, don’t hesitate to visit:https://www.facebook.com/pavtubefans/app/198826126804423/

No.4 Bestseller Pavtube Video Converter Ultimate for Windows/Mac with 50% OFF - Only $32

Key Features
- 2D/3D Blu-ray Ripper + DVD Ripper + ISO Converter + 4K Converter + 3D Converter + SD/HD Video Converter
- Save a 100% intact BD M2TS/ DVD VOB movie without extras
- Convert/Rip Blu-ray/DVD to virtually any video/audio format
- Decode and Encode H.265/HEVC, XAVC, etc. 4K Video to 4K/HD Videos
- Full disc copy with original BD/DVD structure
- Rip 2D/3D Blu-ray/Video and (HD)DVD to 3D MKV, MP4, MOV, WMV, AVI in Side by Side, Anaglyph and Top/Bottom 3 different modes
- Create playable video files for portable devices, game consoles, media players/servers, TVs, projector, VR headsets and more
- Create editable files for Non-linear editing systems like FCP, iMovie, EDIUS Pro 8/7/6, Adobe Premiere Pro CC/CS6/5/4/3, After Effects CC/CS6, Avid Media Composer, GoPro Studio, Sony Vegas Pro,  Sony Movie Studio, Pinnacle Studio, Windows Movie Maker, MAGIX Movie Edit Pro HD, Corel VideoStudio Pro, Cyberlink PowerDirector and more
- A professional video editing tool with trim, crop, split, merge and other options
- Improve Blu-Ray Ripping & Copying Speed With GPU Acceleration

5 Reasons Why Choose Pavtube Video Converter Ultimate
Pavtube Video Converter Ultimate Review
Wondershare vs Pavtube Video Converter Ultimate


No.5 Bestseller Pavtube ByteCopy for Windows/Mac with 50% OFF - Only $21

Key Features
- Support All Blu-ray Related Copy Protections
- Lossless Backup Blu-ray and DVD movies to MKV container with multiple audio/subtitle tracks
- Allow full preservation of all audio/subtitles tracks and chapter markers
- Preserve a 100% BD M2TS/DVD VOB movie without extras
- Convert Blu-ray/DVD/ISO to Multi-track MP4, MOV, AVI, Apple ProRes
- Create 2D/3D Blu-ray/DVD to 3D MKV, MP4, MOV, WMV, AVI in Side by Side, Anaglyph and Top/Bottom 3 different modes
- Best solution to watch BD/DVD/ISO movies on portable devices, game consoles, media players/servers, TVs, projector, VR headsets, Non-linear editing system, etc. 
- Support exporting forced subtitles and .srt external subtitles
- Support insert srt/ass/ssa subtitles to any movie file
- Remove unwanted audio tracks and subtitles streams at will
- Encode Blu-ray/DVD/ISO to H.265/HEVC MKV/MP4
- Fast conversion with NVIDIA CUDA/ AMD GPU acceleration technology
- Well compatible with Windows 10
- Customize Blu-ray/DVD with built-in video editor

ByteCopy Review
ByteCopy for Mac Review
MakeMKV vs ByteCopy vs DVDFab
Top 5 reasons to pick Pavtube ByteCopy on PC/Mac


No.6 Bestseller Pavtube BDMagic for Windows/Mac with 50% OFF - Only $24.5

Key Features
- 2D/3D Blu-ray Ripper + 2D/3D Blu-ray Copy + 2D/3D ISO Converter + DVD Ripper
- Bypass all copy & region protections
- Preserve the BD/DVD's original file structure by using "Copy the entire disc" function.
- Blu-ray and DVD Main title content copy
- Rip/Convert 2D/3D Blu-ray and DVD discs & ISO to various videos like MP4, AVI, MKV, MOV, WMV, MPG, FLV, SWF, etc.
- Rip and Encode Blu-ray and DVD to H.265/HEVC MP4/MKV
- Create 2D Blu-ray/DVD/ISO to 3D movies in Side by Side, Anaglyph and Top/Bottom 3 different modes
- Create playable video files for portable devices, game consoles, media players/servers, TVs, projector, VR headsets and more
-- Customizable video parameters and effect
- Customize Blu-ray/DVD with built-in video editor
- Fast conversion with NVIDIA CUDA/AMD GPU acceleration technology

Top 5 Reasons to choose Pavtube BDMagic
Pavtube BDMagic Review
Pavtube ByteCopy vs Pavtube BDMagic
Pavtube BDMagic vs Handbrake


No.7 Bestseller Pavtube DVDAid for Windows/Mac with 50% OFF - Only $17.5

Key Features
- Unlock Region Code & Copy Protections
- Superior support any kinds of DVD and ISO/IFO image files
- Back up DVD with 1:1 original quality
- Support HEVC/H.265 and M3U8 Output
- Convert DVD to common, HD, 3D and 4K video & audio in 250+ formats.
- Edit and personalize DVD instantly
- Convert 6X faster and keep excellent video quality
- Provide optimized preset formats for Mobile Devices/Game Consoles/TV/NLE/Web, etc.

Reviews: Pavtube DVDAid vs Slysoft AnyDVD
Top 5 Apple/Android DVD Ripper Review
Top 5 DVD Copy Review
Best DVD to MP4 Converter Review


Friday, March 18, 2016

XAVC to FCP: How to Get XAVC Support in Final Cut Pro X?

XAVC, a recording format introduced by Sony, has been developed as an open format, providing a license program for other manufacturers in the broadcast and production industry to develop their own high quality and high frame rate products. 


To be able to import XAVC media to Final Cut Pro X, you'll need to download and install Sony's free XAVC plugin PDZK-LT2, allowing viewing and editing capability in Final Cut Pro X. While, this Camera Import Plugin only provides support for XAVC files shot on Sony SxS card but not Professional Disc. 

Besides, there are system requirements and some nots when using the plugin:

XAVC Plugin Notes and System Requirements:
  • Applicable Products: PMW-F55/F5
  • Version 1.2 of this plug-in requires: Mac OS X 10.9; Final Cut Pro 10.1 or later; For all other supported OS, please use version 1.1.
  • Version 1.1 of this plug-in requires: Final Cut Pro 10.0.8 or higher for XAVC format.
As you see, Sony's XAVC did not work with FCP X 10.0.7 or later version. On the other hand, the Camera Import plugin is only suitable for Sony PMW-F55 and Sony F5. For Sony's other 4K cameras like FDR-AX100, PXW-FS7, PXW-X70, PXW-X160 or PXW-X500, something called Content Browser sold by Sony might help. 

However, many folks gives feedback that they can see the XAVC clips and play them in the Content Browser it doesn't allow me to import them into FCP X while getting the Error message “A Clip that cannot be imported to Final Cut Pro is included. There may be no codec for FCP X. Please confirm the Update information of FCP X.”

In fact, there is an easier and more effective way to solve the XAVC and Final Cut Pro X importing problem regradless of the FCP X version or Mac System. 

How to edit XAVC video in Final Cut Pro X? The best XAVC to FCP X solution is transcode XAVC to Final Cut Pro X ompatible format.

As known to all, Final Cut Pro works best with video clips in ProRes MOV format. Therefore, the easy workaround is, getPavtube Video Converter for Mac (Best XAVC/XAVC S Video Converter for Mac Review) to convert XAVC to ProRes, which will save you both time and trouble, and all you need is to drag the result videos for prompt editing.

Overall, the program is an easy-to-use yet professional XAVC Converter for Mac(El Capitan included). It is able to transcode XAVC files to FCP compatible ProRes 422, ProRes 422 HQ, ProRes Proxy, ProRes 422 LT, ProRes 4444 video.>>Types of Apple ProRes Codecs 

Plus, you may also encode XAVC to Avid Media Composer, Adobe Premiere Pro, iMovie and more NLE programs highly compatible formats for smooth editing. Besides, it might help you change XAVC to other frequent formats like MOV, MKV, MP4, AVI, etc for playback on media devices. 

The trail-before-purchase is supported, just feel free to try it:


Key Feature of Pavtube Video Converter:
  • Support nearly all HD/SD video and audio formats to various video and audio format;
  • Make videos & movies & audios compatible with Android tablets/Phones, Apple devices, Mac OS X El Capitan, video game console, websites and more;
  • Edit videos with trim, crop, split, merge and special effects;
  • Process videos and movies in batch even faster and easier;
  • Attach external *.srt, *.ass, or *.ssa subtitles into source media for entertainment;
  • Support perfect audio and video synchronization.
Install and run it, you will see the interface. The following is a simple instruction of how to use this Pavtube Video Converter for Mac:

How to Get XAVC Support in Final Cut Pro X

Step 1: Add XAVC footage to the program.

Launch the software on your Mac computer, click "File" menu, select "Add Video/Audio" or "Add from folder" to import XAVC footage to the program.


Step 2: Choose output format.

Click "Format" bar, from its drop-down options, move your mouse to "Final Cut Pro > Apple ProRes 422 (*.mov)" to select it as the output file format.


Step 3: Customize output ProRes parameters.

Open "Profile Settings" window to adjust the output video codec, size, bit rate, frame rate, audio codec, sample rate, bit rate and channels.


Step 4: Convert XAVC Video to FCP X.

Hit the convert button under the preview windows, the program will start XAVC footage to Apple ProRes MOV conversion for Final Cut Pro X.

When the conversion is completed, run FCP X and import the ProRes codec footage for post production workflow.

If you are running on Windows,for other windows NLEs please get Pavtube Video Converter.

Read More:

Tuesday, March 15, 2016

XAVC Editing: Sony Movie Studio 13 Supported XAVC Editing?

If you got some XAVC files, you may wanna know the compatibility XAVC with Sony Movie Studio 13, so that you can edit XAVC files in Sony Movie Studio 13 with ease. In this page, we will give you some tricks about how to import XAVC to Sony Movie Studio 13 smoothly. 


According to the Sony's official website, Sony Movie Studio can support XAVC format, but due to the codec issue, Sony Movie Studio might not work with all XAVC files. As far as we know, until Sony Movie Studio 13, it provides native support for XAVC media. 

However, when work XAVC in Sony Movie Studio 13, importing and editing problems still occurred from time to time like "the file has no audio or video streams"...

You need to find another way to perform the task. As we all know, the most compatible video codec for Sony Movie Studio is MPEG-2, then transocoding XAVC files to MPEG-2 with a third party program is an easy way to edit XAVC videos in Sony Movie Studio 13.

To transocode XAVC files to MPEG-2, below is a simple tutorial to make it smoother to get XAVC files into Sony Movie Studio 13.

Here’s what you need:

Pavtube Video Converter


Pavtube Video Converter comes out which works as the best XAVC converter app for you. It can easily transcode XAVC to Sony Movie Studio 13 friendly format-MPEG-2 without quality loss. 

What's more, this powerful video converter offers more professional codec for NLEs, like DNxHD for Avid Media Composer, MPEG-2 for Sony Vegas Pro/Adobe Premiere Pro, WMV for Windows Movie Maker and more.

As for Mac users, Pavtube Video Converter for Mac will let you convert XAVC 4K video files to iMovie, FCPAdobe Premiere & more on Mac OS X (10.11 El Capitan included) with ease. Download the program and follow the steps below to convert your videos. 

Install and run it, you will see the interface. The following is a simple instruction of how to use this Pavtube Video Converter: 

How to Convert and Import 4K XAVC Files to Sony Movie Studio 13

Step 1. Click the button “File” to add XAVC files (or directly drag and drop your files) to the Converter.


Tips: When the 4K XAVC files are loaded to the Pavtube Video Converter, you can view the videos from the Preview window. Simply select an item and click the “Play” button. When the video is playing, you are allowed to take snapshoot.

Step 2. From "Format" drop-down list, select to out "Adobe Premiere/Sony... "> "MPEG-2 (*.mpg)" format for editing with Sony Movie Studio 13.


Step 3. You can click “settings” to adjust the output parameters, like resolution, bitrate, etc. Don't forget the balance between video quality and size. 


Step 4. Last, click the "Convert" button to start 4K XAVC to Sony Movie Studio 13 conversion. 

That's all you are required to do. In fact, this video converter can help you do more. 

Once the conversion completes, you can click "Open" button to get the generated MPEG-2 files for Sony Movie Studio 13 easily. Then, it would be easy for importing and editing 4K XAVC files with Sony Movie Studio 13.

Read More:

Friday, March 11, 2016

XAVC and Sony Vegas Platinum 13: Can be XAVC imported into Sony Vegas Platinum 13?

“Anyone know how to get the 4K video file to be accepted into Sony Vegas Platinum 13? The files will open in Adobe Premier, but I am more comfortable with my knowledge in the Vegas editor.”


Sony Vegas Platinum 13 is a professional and popular video editing software for Windows 8, XP, Vista and 7. Many people are using it to make home movies, especially for editing camcorder videos. 

In order to edit XAVC 4K videos into Sony Vegas Platinum 13 smoothly, the easy workaround is to use 3rd-party to rewrap and convert XAVC 4K footage to a more “editable” format in 1080p. 

The recommended tool to convert XAVC 4K video to Sony Vegas Platinum 13 is Pavtube Video Converter, an intuitive conversion program that lets you convert over 70+ video and audio formats in your desired form effortlessly. With it, you can finish converting your XAVC 4K videos to Sony Vegas Platinum 13 supported format at a few mouse clicks in Windows (Windows 10 included). 

As for Mac users, Pavtube Video Converter for Mac will let you convert XAVC 4K video files to iMovie, FCPAdobe Premiere & more on Mac OS X (10.11 El Capitan included) with ease. Download the program and follow the steps below to convert your videos. 

The trail-before-purchase is supported, just feel free to try it:


Key Features:
  • Three simple clicks to convert 4K XAVC videos to Sony Vegas Platinum 13 compatible formats.
  • Aside from Sony Vegas Platinum 13, you can directly convert 4K XAVC to Adobe Premiere, Avid, Sony Vegas and more video editors supported formats without additional settings.
  • Edit your 4K XAVC videos before converting them. With the built-in editor, you can trim or crop your videos. And you are able to add subtitles and watermarks to the videos as well.
  • Perfectly compatible with Windows 10, Windows 8, Windows 7, Windows XP, Windows Vista, and Windows 2000.
Warm tip: The conversion speed is very fast because it supports batch conversion and NVIDIA CUDA & ATI Stream (AMD APP) acceleration technologies. It converts multiple video clips at the same time, moreover it can shut down computer after the process is complete, so run the app overnight and you could enjoy the created videos next morning when you are up.

Install and run it, you will see the interface. The following is a simple instruction of how to use this Pavtube Video Converter: 

How to Convert and Import 4K XAVC Files to Sony Vegas Platinum 13

Step 1. Click the button “File” to add XAVC files (or directly drag and drop your files) to the Converter.


Tips: When the 4K XAVC files are loaded to the Pavtube Video Converter, you can view the videos from the Preview window. Simply select an item and click the “Play” button. When the video is playing, you are allowed to take snapshoot.

Step 2. From "Format" drop-down list, select to out "Adobe Premiere/Sony... "> "MPEG-2 (*.mpg)" format for editing with Sony Vegas Platinum 13.


Step 3. You can click “settings” to adjust the output parameters, like resolution, bitrate, etc. Don't forget the balance between video quality and size. 


Step 4. Last, click the "Convert" button to start 4K XAVC to Sony Vegas Platinum 13 conversion. 

That's all you are required to do. In fact, this video converter can help you do more. 

Once the conversion completes, you can click "Open" button to get the generated MPEG-2 files for Sony Vegas Platinum 13 easily. Then, it would be easy for importing and editing 4K XAVC files with Sony Vegas Platinum 13.

Read More:

Tuesday, March 8, 2016

Easy way to load XAVC file to Windows Movie Maker

“I'm planning to edit XAVC videos in Windows Movie Maker, however it seems to be not supported. I got the error message from the windows. Does Windows Movie Maker deal with XAVC files ? How should I edit them?”


Windows Movie Maker is the best free video editing software which could help the windows users freely edit and create movies. 

In order to make the XAVC file work smoothly in Windows Movie Maker, you need to be clear what file formats are supported for importing into the editing tool first.

What kind of files can be used in Movie Maker?


Video file types (format)


File name extensions


Windows Media Video (WMV) files


.wmv


Windows Media files


.asf and .wm


AVCHD files


.m2ts, .mts, and .m2t


Apple QuickTime files


.mov and .qt


DV‑AVI files


.avi


Microsoft Recorded TV Show files


.dvr-ms and .wtv


MPEG‑4 movie files


.mp4, .mov,.m4v, .3gp, .3g2, and .k3g


MPEG‑2 movie files


.mpeg, .mpg, .mpe, .m1v, .mp2, .mpv2, .mod, .vob, and .m2t


MPEG‑1 movie files


.m1v


Motion JPEG files


.avi and .mov


From above video format picture, it is obvious to notice that Windows Movie Maker deals with the XAVC files hardly . To make the Sony XAVC file compatible with Windows Movie Maker perfectly, the simple workaround is to transcode Sony XAVC to WMV, the native video format supported by Windows Movie Maker.

Pavtube Video Converter is perfect for you to finish the conversion job on any Windows computer. It supports creating high quality WMV video for your Windows Movie Maker on Windows 10/8/7/XP/Vista, no matter what's the format of your source video files. It can convert almost any video to WMV so you can import your XAVC video to Windows Movie Maker for editing. 

Plus, it comes with all regular video editing tools like Trim, Crop, Effect, Watermark. For basic video editing tasks, you can even replace your Windows Movie Maker with it. The following tutorial will give you some detailed information on how to convert XAVC to Windows Movie Maker friendly video format.

Tip: If you are a Mac user and planning to edit XAVC files in FCP/iMovie/Avid/Adobe Premiere or play XAVC files on some portable devices, then Pavtube Video Converter for Mac is right for you.

The trail-before-purchase is supported, just feel free to try it:


Key Features:
  • Three simple clicks to convert 4K XAVC videos to Windows Movie Maker compatible formats.
  • Aside from Windows Movie Maker, you can directly convert 4K XAVC to Adobe Premiere, Avid, Sony Vegas and more video editors supported formats without additional settings.
  • Edit your 4K XAVC videos before converting them. With the built-in editor, you can trim or crop your videos. And you are able to add subtitles and watermarks to the videos as well.
  • Perfectly compatible with Windows 10, Windows 8, Windows 7, Windows XP, Windows Vista, and Windows 2000.
Warm tip: The conversion speed is very fast because it supports batch conversion and NVIDIA CUDA & ATI Stream (AMD APP) acceleration technologies. It converts multiple video clips at the same time, moreover it can shut down computer after the process is complete, so run the app overnight and you could enjoy the created videos next morning when you are up.

Install and run it, you will see the interface. The following is a simple instruction of how to use this Pavtube Video Converter: 

How to Convert and Import 4K XAVC Files to Windows Movie Maker

Step 1: Import XAVC files.

Click the button “File” to add XAVC files (or directly drag and drop your files) to the Converter.


Tip: If you want to merge MTS files before edit in Windows Movie Maker, just need to check the “Merge into one” box.

Step 2: Select an output format for Windows Movie Maker.

Click “Format” bar to select suitable format for Windows Movie Maker. WMV is one of the proper formats for Windows Movie Maker.


Step 3: Tap the“Settings”icon to adjust audio and video parameters for Windows Movie Maker. 

Once you have chosen the output format, then click the "Settings" right beside "Format" to adjust the video and audio parameters.

Step 4: Tap the big Convert button on the main interface to start transcoding Sony XAVC to Windows Movie Maker.

The conversion should be quickly finished. Once the process is at 100%, you can have the converted file easily worked with Windows Movie Maker.

Read More: