To be able to import XAVC media to Final Cut Pro X, you'll need to download and install Sony's free XAVC plugin PDZK-LT2, allowing viewing and editing capability in Final Cut Pro X. While, this Camera Import Plugin only provides support for XAVC files shot on Sony SxS card but not Professional Disc.
Besides, there are system requirements and some nots when using the plugin:
XAVC Plugin Notes and System Requirements:
- Applicable Products: PMW-F55/F5
- Version 1.2 of this plug-in requires: Mac OS X 10.9; Final Cut Pro 10.1 or later; For all other supported OS, please use version 1.1.
- Version 1.1 of this plug-in requires: Final Cut Pro 10.0.8 or higher for XAVC format.
However, many folks gives feedback that they can see the XAVC clips and play them in the Content Browser it doesn't allow me to import them into FCP X while getting the Error message “A Clip that cannot be imported to Final Cut Pro is included. There may be no codec for FCP X. Please confirm the Update information of FCP X.”
In fact, there is an easier and more effective way to solve the XAVC and Final Cut Pro X importing problem regradless of the FCP X version or Mac System.
How to edit XAVC video in Final Cut Pro X? The best XAVC to FCP X solution is transcode XAVC to Final Cut Pro X ompatible format.
As known to all, Final Cut Pro works best with video clips in ProRes MOV format. Therefore, the easy workaround is, getPavtube Video Converter for Mac (Best XAVC/XAVC S Video Converter for Mac Review) to convert XAVC to ProRes, which will save you both time and trouble, and all you need is to drag the result videos for prompt editing.
Overall, the program is an easy-to-use yet professional XAVC Converter for Mac(El Capitan included). It is able to transcode XAVC files to FCP compatible ProRes 422, ProRes 422 HQ, ProRes Proxy, ProRes 422 LT, ProRes 4444 video.>>Types of Apple ProRes Codecs
Plus, you may also encode XAVC to Avid Media Composer, Adobe Premiere Pro, iMovie and more NLE programs highly compatible formats for smooth editing. Besides, it might help you change XAVC to other frequent formats like MOV, MKV, MP4, AVI, etc for playback on media devices.
The trail-before-purchase is supported, just feel free to try it:


Key Feature of Pavtube Video Converter:
- Support nearly all HD/SD video and audio formats to various video and audio format;
- Make videos & movies & audios compatible with Android tablets/Phones, Apple devices, Mac OS X El Capitan, video game console, websites and more;
- Edit videos with trim, crop, split, merge and special effects;
- Process videos and movies in batch even faster and easier;
- Attach external *.srt, *.ass, or *.ssa subtitles into source media for entertainment;
- Support perfect audio and video synchronization.
How to Get XAVC Support in Final Cut Pro X
Step 1: Add XAVC footage to the program.
Launch the software on your Mac computer, click "File" menu, select "Add Video/Audio" or "Add from folder" to import XAVC footage to the program.

Step 2: Choose output format.
Click "Format" bar, from its drop-down options, move your mouse to "Final Cut Pro > Apple ProRes 422 (*.mov)" to select it as the output file format.

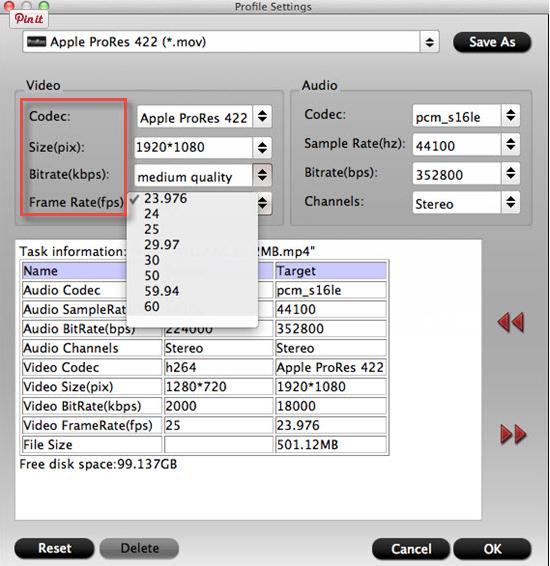
Step 3: Customize output ProRes parameters.
Open "Profile Settings" window to adjust the output video codec, size, bit rate, frame rate, audio codec, sample rate, bit rate and channels.

Step 4: Convert XAVC Video to FCP X.
Hit the convert button under the preview windows, the program will start XAVC footage to Apple ProRes MOV conversion for Final Cut Pro X.
When the conversion is completed, run FCP X and import the ProRes codec footage for post production workflow.
If you are running on Windows,for other windows NLEs please get Pavtube Video Converter.
Read More: