Windows Movie Maker is a free video editing software from Microsoft. With the Movie Maker, it can bring your movie to life with a soundtrack that you can edit yourself. If you have many footage, you can trim it, split it, speed it up or slow it down, you can also choose a theme to express your unique style with Windows Movie Maker, you can publish it to the web like OneDrive, Facebook, Vimeo, YouTube, and Flickr so you can share it with family and friends.
But Windows Movie Maker supported formats is limited. This free editing software only support WMV and AVI video well.
How to edit XAVC S in Windows Movie Maker on Windows 10
XAVC-S, a recording format introduced by Sony, has been developed as an open format, providing a license program for other manufacturers in the broadcast and production industry to develop their own high quality and high frame rate products.
However, due to XAVC S is a shell format, instead of a compressed format, therefore it can’t be guaranteed that each one XAVC S file can be identified by any kind of decoder. Because of this, some people who import their XAVC S footage into Windows Movie Maker on Windows 10 for editing often encounter a series of problems.
Issue on importing XAVC S in Windows Movie Maker on Windows 10
- “I am trying to work with some XAVC S footage into Windows Movie Maker on Windows 10. However, I (and apparently others) have tried the traditional importing method — and it’s a no-go, it seems that Windows Movie Maker doesn’t support XAVC S. What can I do?”
- “I got a rather huge XAVC S footage which I want to transfer them into Windows Movie Maker to make a life short video movie. But, “sound missing” when I open MXF files in Windows Movie Maker, what’s wrong with it?”
- “Hey, help! I upgraded my computer from Windows 8 to Windows 10 last week. Today I import my XAVC S recordings into Windows Movie Maker 12, but I feel it take me lots of time. Finally I failed. Is there a effective method for me to edit XAVC S files in Windows Movie Maker 12 smoothly.”
As far as we know, XAVC S format can’t be natively supported by many professional video editing applications including Windows Movie Maker. In order to smoothly edit XAVC S in Windows Movie Maker on Windows 10, we need to convert XAVC S files to Windows Movie Maker best supported format via third-party software.
Here, Pavtube Video Converter is highly recommended to you, because it is a professional video converter on the market. The XAVC S to Windows Movie Maker converter has native output formats for Windows Movie Maker- WMV, so with it, you can easily transcode your XAVC S footage into WMV for editing directly in Windows Movie Maker without any problem.
Plus, it comes with all regular video editing tools like Trim, Crop, Effect, Watermark. For basic video editing tasks, you can even replace your Windows Movie Maker with it. The following tutorial will give you some detailed information on how to convert XAVC S to Windows Movie Maker friendly video format.
Tip: If you are a Mac user and planning to edit XAVC files in FCP/iMovie/Avid/Adobe Premiere or play XAVC files on some portable devices, then Pavtube Video Converter for Mac is right for you.
The trail-before-purchase is supported, just feel free to try it:


Key Features:
- Three simple clicks to convert 4K XAVC S videos to Windows Movie Maker compatible formats.
- Aside from Windows Movie Maker, you can directly convert 4K XAVC S to Adobe Premiere, Avid, Sony Vegas and more video editors supported formats without additional settings.
- Edit your 4K XAVC S videos before converting them. With the built-in editor, you can trim or crop your videos. And you are able to add subtitles and watermarks to the videos as well.
- Perfectly compatible with Windows 10, Windows 8, Windows 7, Windows XP, Windows Vista, and Windows 2000.
Install and run it, you will see the interface. The following is a simple instruction of how to use this Pavtube Video Converter:
How to Convert and Import 4K XAVC Files to Windows Movie Maker
Step 1: Import XAVC S files.
Click the button “File” to add XAVC S files (or directly drag and drop your files) to the Converter.

Tip: If you want to merge MTS files before edit in Windows Movie Maker, just need to check the “Merge into one” box.
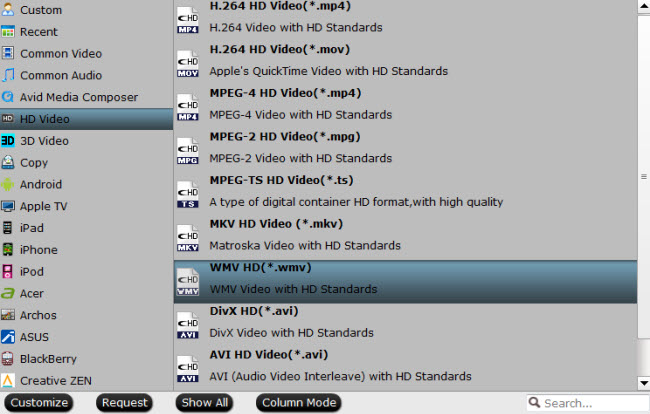
Step 2: Select an output format for Windows Movie Maker.
Click “Format” bar to select suitable format for Windows Movie Maker. WMV is one of the proper formats for Windows Movie Maker.
Step 3: Tap the“Settings”icon to adjust audio and video parameters for Windows Movie Maker.
Once you have chosen the output format, then click the "Settings" right beside "Format" to adjust the video and audio parameters.
Step 4: Tap the big Convert button on the main interface to start transcoding XAVC S to Windows Movie Maker.
The conversion should be quickly finished. Once the process is at 100%, you can have the converted file easily worked with Windows Movie Maker.
Read More:
No comments:
Post a Comment