Summary: Most NLEs can’t support the .mts files which came from Sony A7II XAVC , how to deal with this problem to import videos natively? Most editors in the market like FCP, Adobe Premiere, they are all included in non-linear editing system. The most outstanding advantage of the non-linear editing is that if you import your source videos into those editors, there will be no lose or modified during editing. This is one of the biggest advantages of non-leaner editing compared to linear editing.Here is the best XAVC Video Converter Review which I hope can help you a lot in editing or playing XAVC files.But did you find that if you want to directly import your source video into those NLE to do the following edits, which some error messages will pop up? That was because your source videos came from your camera can’t be opened natively. Take this Sony Alpha A7II for example, the video shoot under the XAVC-S mode may came as MXF, which cannot be natively supported by those NLEs.How to convert those XAVC-S MXF files to open them natively in NLE?Since there are so many NLE in the market , let’s take this FCP for example. You may say that with the latest FCP, this MXF format can be supported without any rewrapping. But with this XAVC codec, it may still cause some problem when you import them into FCP. The best way to tackle this kind of problem is to find yourself a XAVC Converter and then convert to the native format like Apple ProRes HQ. Here Pavtube HD Video Converter for Mac (review) is highly recommended. It’s more than a converter, it’s also an editor and a player.
 Other Download:- Pavtube old official address: http://www.pavtube.com/hd-video-converter-mac/- Amazon Store Download: http://www.amazon.com/Pavtube-Video-Converter-Mac-Download/dp/B00QI9GNZS- AppStore Download: https://itunes.apple.com/de/app/pavtube-hd-video-converter/id502792488?mt=12- Cnet Download: http://download.cnet.com/Pavtube-HD-Video-Converter/3000-2194_4-76177786.htmlSee detailed workflow of this conversion below:Step 1: Download this Pavtube HD Video Converter for Mac and install it step by step. Then load your XAVC MXF files into this software by clicking “Add Video” or “Add from folder”.
 Step 2: After importing them into this program, it’s time to select suitable output ones for different non-linear editing tools. Let me show you some examples below:A: Come to the output list, let’s choose the “Final Cut Pro” to select the “Apple ProRes Codec 422 (*.mov)” as the best. Additionally, you can also choose several ProRes codec as your favorite.
 B: For Avid Media Composer: Drop down the output list, we suggest you to choose the “Avid Media Composer>>AvidDNxHD (*.mov)” as the best output.C: While for iMovie and FCE, here we have offered the “iMovie and Final Cut Express>>Apple InterMediate Codec (AIC) (*.mov)” there. Do you wanna a try?Step 3: When everything is done, back to the main interface and click “Convert” to start the conversion work.Conclusion: After conversion, you can get the generated files by hitting “Open” button. Now, you can easily editing Sony Alpha a7II XAVC S in FCP, Avid Media Composer and iMovie/FCE.Expand Knowledge:NLE is an acronym, it stands for non-linear editing system. This is a video or audio editing digital audio workstation system. Non-linear editing is the most natural approach when all assets are available as files on video servers or hard disks. Rather than recordings on reels or tapes, while linear editing is what kind of system that need to sequentially view film or hear tape.Source: http://digisns.com/2014/12/convert-sony-a7ii-xavc-to-mov-in-nle/Further Reading:
Summary: In this tutorial, we explore how to edit Sony a7II XAVC S files in Premiere Pro CC/After Effects CC. Hope you can find answers below.
 The Sony Alpha A7 II is the sequel to a camera series that bowled us over last year. Now it has come to us. In addition to highly detailed stills with smooth gradations, the a7II now has access to the high-bit-rate XAVC S format with 60p, 30p, and 24p recording options, all at 50 Mbps. If you've got some XAVC S material from Alpha A7 II, you will research possible workflows, so as to as have smooth work with the Sony a7II XAVC S in PPro CC/AE CC.Why is a7II so popular among photographers? Though more and more HD cameras have been released by Sony, a7II has the stable shooting ability and the high definition output footage XAVC S. But the only disadvantage is as follows: “As a teacher who teaches video production in the studying courses, I’m trying to use my Sony A7II camera to shoot some recordings of my students and pick them out to show in the Students’ ‘Film Festival’, I need to edit the output videos in Premiere Pro CC on Mac. However, it seemed that XAVC S files are not so compatible with this program, right? How about editing in After Effects CC?”Tips: Adobe Premiere Pro supported formatsWhile enjoying the stunning videos recorded of HD image quality, many users are having problems when trying to edit Alpha a7II XAVC S in some popular NLEs. What we need here is a XAVC S Video Converter! Easy operations to do with XAVC S files and make them accepted by common editing programs and media players with a high quality preserved. Here, you can depend on Pavtube HD Video Converter for Mac. If you are Windows users, you can refer to Pavtube HD Video Converter. Other Download:- Pavtube old official address: http://www.pavtube.com/hd-video-converter-mac/- Amazon Store Download: http://www.amazon.com/Pavtube-Video-Converter-Mac-Download/dp/B00QI9GNZS- AppStore Download: https://itunes.apple.com/de/app/pavtube-hd-video-converter/id502792488?mt=12- Cnet Download: http://download.cnet.com/Pavtube-HD-Video-Converter/3000-2194_4-76177786.htmlHow to edit Sony a7II XAVC S in Premiere Pro CC/After Effects CC?Step 1: Backup your XAVC S videos from a7II to hard drive. Install and launch XAVC S HD Video Converter for Mac. Drag and drop XAVC S files to the software. You can import multiple files at once thanks to “Add from folder” button.
 Step 2: Click the drop-down list in the format line to get the format box. Then choose “Adobe Premiere/Sony Vegas>>MPEG-2 (*.mpg)” as output format for editing in Premiere Pro CC/After Effects CC.Tips: WMV (VC-1) (*.wmv) and MOV (AVC) (*.mov) are both supported. Generally, MPEG-2 is a well-accepted file format for its ability to keep up the video quality and its popularity.
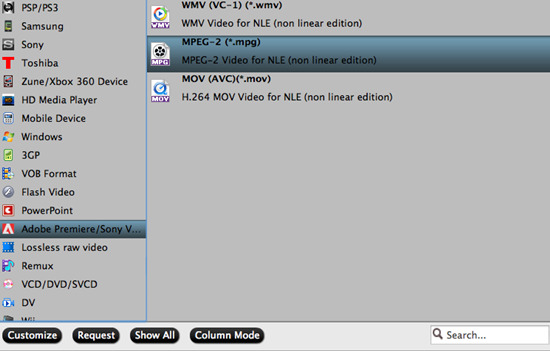 Step 3: Do some simple edit work.
De-interlace: By default the XAVC S HD Video Converter for Mac will apply de-interlacing facility to some clips that are interlaced. Just click “Edit” to enter the video editor, switch to “Effect” tab, and check the “Deinterlacing” box.Trim: Basically, video hosting sites restrict video clips to be in certain file size and length. For example, YouTube stated that “videos can be up to 2GB in size and 10 minutes long”. You can trim the video to desired length with this HD Video Converter for Mac. Simply click “Edit” menu>>”Trim” tab and set start and end time point.Merge: To join multiple videos together, just select them in file list, and tick off the checkbox “Merge into one file” on the main interface.Step 4: You can preview to check the final result. Once you are satisfied with it, click the “Convert” button to start converting XAVC S videos to MPEG-2 .mpg format. It will take you a little while.Conclusion: After conversion, you’ll get no troubles in editing a7II XAVC S videos in Premiere Pro CC/After Effects CC. Follow the steps and have a try!Source: http://camcordervideoshare.altervista.org/blog/edit-xavc-s-in-ppro-after-effects-cc/Further Reading:
Summary: XAVC codec has already become the mainstream codec now. But most edit software such as FCP X/iMovie can't handle such video codec. How to tackle this problem?
 For many camera and video guys, this XAVC is very familiar with them. XAVC is a recording format that was introduced by Sony on October 30, 2012. And XAVC used level 5.2 of H.264/MPEG-4 AVC which is the highest level supported by that video standard. XAVC can support 4K resolution (4096*2160 and 3840*2160) at up to 60frames per second. That would be a big progress for promoting the 4K movie spread. This format has already become the foundation of the modern digital devices. And Material Exchange Format (MXF) may be used as its digital container format.Now, here comes the problem. With this wide spread codec, more and more companies just develop their products based on this codec. Sony, which the initiator of this digital revolution, has made many customers encountered their “Waterloo”. Although Sony claimed that FCP X can support this XAVC naturally, the truth is just on its opposite. For some users who wants to do some following edits in FCP X or iMovie , this work just can’t be done. Enjoy these high definition videos on their Table, phone or TV just can’t be realized. How frustrating it is! You owned a bunch of fabulous videos, but you just can’t enjoy them.How to import your high definition XAVC videos into your edit software or enjoy them freely on your mobile devices? Here are two ways to get you free from this dilemma.Method 1: Using Sony XAVC/XDCAM Plug-in for Apple (PDZK-LT2) for FCP or XAVC/XDCAM Plug-in for Avid (PDZK-MA2) for AvidIn order to solve this problem, Sony itself has released two plug-in proxies for users. These are Sony XAVC/XDCAM Plug-in for Apple (PDZK-LT2) for FCP and XAVC/XDCAM Plug-in for Avid (PDZK-MA2) for Avid. Those tow plug-in are developed by Sony, they are free and in most of the circumstance, they can solve users’ can’t import XAVC problem.But these free apps will work well if your video file structure is very intact. Users can directly import their video folder into this free plug-in from their camera. Or copy the whole file structure into their hard drivers then load them info these MXF plug-in apps. Those are the premises to use these free proxies. But if you just get some “Orphan” MXF files from your clients? If you just download it from somewhere that the files never will have a complete structure? Or if you just messed up your videos with other files? How to solve it?Method 2: Applying for some third-party XAVC Converter software to solve XAVC unavailable problem.There are so many converter apps in the market for users to choose, but which one is the best one for XAVC codec converting? Here, I would like to recommend this Pavtube iMixMXF for you guys. As you can tell from the name, this app is professional for handling MXF format. And one more features I would like to mention about is “Multi-track Video” option. Think about it, there must be a inner mic in your camera and sometimes you just want to install an external mic for a better audio effects. Then there will be two audio tracks in your recorded video. Some normal MXF converters can only keep one of them and lose another one or simply messed them up. But to this Pavtube iMixMXF , you don’t have to worry about this will happen. For win users, Pavtube MXF Multimixer can run on win 8 smoothly. Other Download: - Pavtube old official address: http://www.pavtube.com/imixmxf-mac/- Amazon Download: http://www.amazon.com/Pavtube-Studio-iMixMXF-Download/dp/B00QI7MY4Y- Cnet Download: http://download.cnet.com/Pavtube-iMixMXF/3000-2194_4-76171460.htmlThe detailed workflow of using iMixMXF to convert XAVC (*.mxf ) files:Step 1: First, go to the Pavtube official website to download this iMixMXF then install it step by step. Second, load your XAVC (*.MXF) files. You can load them by click the “Add Video” or “Add from folder” icon on this program’s main UI. Directly drag your video into this software is also very convenient if they are on your desktop, especially for your “Orphan” .mxf files.
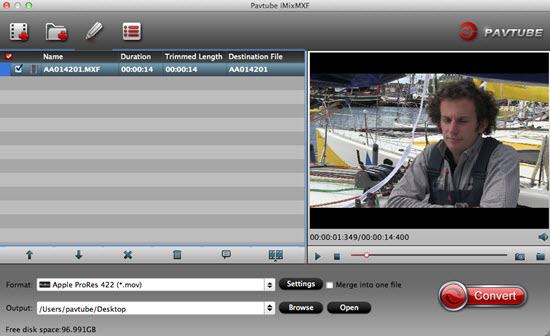 Step 2: Click the “Format” bar to choose the output format you want. In this case, the iMovie is our target format, which you can find iMovie on this software’s format bar list. Choose “iMovie and Final Cut Express>>Apple InterMediate Codec (AIC) (*.mov)” as output format.
 Tips: For FCP X output, choose “Final Cut Pro>>Apple ProRes 422 (*.mov)”.Step 3: If you want to stream your video clip to your Table or your phone so that you can enjoy them whenever and wherever you want, just choose the correct format your devices support. Or select brand name your device on the format list, such as Samsung, iPhone. Then you can enjoy the video without any quality drop or lagging.Step 4: After all have been settled, choose the output folder with enough storage space then hit “Convert” button to start your conversion.Conclusion: After the conversion, you can click the “Open output folder” to check your converted video. Then with these high quality and compatible format videos, just load them into FCP X/iMovie for editing or enjoy them on your mobile devices.Source: http://digisns.com/2014/12/convert-xavc-mxf-into-fcpx-or-imovie/Further Reading:
Summary: Maybe you have come across similar questions when importing Sony F55 XAVC to FCP for editing. Congratulations! What you’re reading is a quick and easy guide for solving the problem.
 I'm a MD/producer/director exposure films ltd, I have recorde some videos TV, digital and commercial with my Sony F55. Since the XAVC footage from F55 is a peripheral non-standard format which is not supported by FCP. To edit my Sony PMW-F55 XAVC video in FCP with a simple way, I have to render to the third-party software to help convert XAVC to Apple ProRes 422 MOV– native format for Final Cut Pro.Then what is the best XAVC Converter to deal with my Sony F55 XAVC codec? I often use MPEG stream clip, it is awesome but doesn't support XAVC. Then I searched on the web and find an easy-to-use yet professional software called Pavtube HD Video Converter for Mac (review), it is only straightforward XAVC converter which offers the best way to help the users of PMW-F55 to edit Sony PMW-F55 XAVC in FCP smoothly by effortlessly and flawlessly transcode Sony XAVC footage to ProRes MOV. It is safe to install and easy to use. Below will show you how to transcode Sony PMW-F55 XAVC footage to ProRes MOV in details. Other Download:- Pavtube old official address: http://www.pavtube.com/hd-video-converter-mac/- Amazon Store Download: http://www.amazon.com/Pavtube-Video-Converter-Mac-Download/dp/B00QI9GNZS- AppStore Download: https://itunes.apple.com/de/app/pavtube-hd-video-converter/id502792488?mt=12- Cnet Download: http://download.cnet.com/Pavtube-HD-Video-Converter/3000-2194_4-76177786.htmlConvert/Import Sony PMW-F55 XAVC to Final Cut Pro for editing smoothly with Apple ProRes Codec on Mac.Step 1: Launch the HD Video Converter on your Mac, and then click the “Add video” button to import your XAVC videos from Sony F55 directly. In order to import several files at one time, you can click “Add from folder” button.
 Step 2: Click the “Format” bar to get the drop-down menu and you can get “Final Cut Pro>>Apple ProRes codec”, including ProRes 422, ProRes 422 (HQ), ProRes 422 (LT), ProRes 422 (Proxy) and ProRes 4444. Choose the proper one you want.
 Step 3: Press the “Settings” icon and you’d better set the video frame rate as 30fps, video size as 1920*1080 for editing Sony F55 XAVC in FCP easily.Step 4: Now, click "Convert" and let it go. The XAVC to FCP Converter for Mac supports batch conversion. So if you have lots of XAVC videos to convert, check “Shut down computer after conversion” and you can go away without keeping an eye on it.Tips: Before you try to do the conversion, if you are also a FCP user, please make sure that you have installed the Apple ProRes Codec manually since the FCP asks users to install it by themselves.Conclusion: Once the conversion process shows in 100%, click “Open” to get the output videos. Create a project and start Sony F55 editing XAVC videos in FCP with light speed.Source: http://handycameratips.jimdo.com/2013/12/04/load-xavc-files-from-sony-f55-to-fcp/Further Reading:
Summary: Do you have any good solutions to the problems of importing Sony A7s XAVC S files to FCP 7 for nice editing? If not, why not be a good reader to follow the article below to know more details? This guide can teach you how to convert your Sony XAVC S to ProRes for smoothly editing in FCP 7.
 “Hi, anyone worked with media from the Sony A7S camera? Especially convert XAVC S 100p/50p files to Apple ProRes because the few times I tried the resulting file does not match the original file, that the file should slow motion (100p/50p) but became normal 25fps not slow-motion (I use HD video converter Acrok) Is there a workflow solution for me to do the settings file XAVC S especially for 100p / 50p to Apple ProRes?”The sensor of Sony A7S is big, the 35mm sensor with large pixels is good for high ISO and dynamic range, 12.2MP sensor optimized for 4K and low light video recording, with this excellent device you can get uncompressed 4:2:2 full HD in XAVC S format. While for some popular editing tools, you will find the XAVC S is not supported for popular editing apps, Final Cut Pro is such a typical one. So what's the available workflow for Sony A7S and FCP?XAVC S, which as the newest one, if you are a professional video editor or photographer, it is not so widely supported for editing tools. Except for FCP 7, such as Premiere Pro, Avid, Sony Vegas, etc. Today here, in order to match the XAVC S recordings to FCP 7 well, we highly recommend you a XAVC S to FCP 7 Converter called Pavtube HD Video Converter for Mac (review), which has the ability of handling HD videos with all popular editors or media players nicely. Other Download:- Pavtube old official address: http://www.pavtube.com/hd-video-converter-mac/- Amazon Store Download: http://www.amazon.com/Pavtube-Video-Converter-Mac-Download/dp/B00QI9GNZS- AppStore Download: https://itunes.apple.com/de/app/pavtube-hd-video-converter/id502792488?mt=12- Cnet Download: http://download.cnet.com/Pavtube-HD-Video-Converter/3000-2194_4-76177786.htmlDetailed steps we should know well how to convert XAVC S to ProRes for nice editing in FCP 7:Step 1: Launch the HD Video Converter on your Mac, and then click the “Add video” button to import your XAVC S videos from Sony A7s directly. In order to import several files at one time, you can click “Add from folder” button.Step 2: Click the “Format” bar to get the drop-down menu and you can get “Final Cut Pro>>Apple ProRes codec”, including ProRes 422, ProRes 422 (HQ), ProRes 422 (LT), ProRes 422 (Proxy) and ProRes 4444. Choose the proper one you want.Step 3: Press the “Settings” icon and you’d better set the video frame rate as 30fps, video size as 1920*1080 for editing Sony A7s XAVC S in FCP 7 easily.Step 4: Now, click "Convert" and let it go. The XAVC S to FCP 7 Converter for Mac supports batch conversion. So if you have lots of XAVC S videos to convert, check “Shut down computer after conversion” and you can go away without keeping an eye on it.Conclusion: Once the conversion process shows in 100%, click “Open” to get the output videos. Create a project and start Sony A7s editing XAVC S videos in FCP 7 with light speed.Source: http://handycameratips.jimdo.com/2014/12/23/workflow-from-a7s-xavc-s-to-fcp-7/Further Reading:
Summary: Having trouble importing Sony PMW-400 XAVC to FCP 7? This article will tell you how to convert XAVC from PMW-400 to ProRes for FCP 7 editing.
 The new shoulder-mount camcorder PMW-400 is designed to acquire high quality, clean images especially in low-light environments. It is the latest addition to its XDCAM HD422 line-up. Sony PMW-400 supports multiple SD and HD codecs and XAVC ready and is an affordable 3x 2/3-inch CCD high quality sensor broadcast camcorder that, like the PMW-500, supports all SD / HD 422 broadcast workflows using MXF and XDCAM EX workflows using MP4 and AVI. It is also future-proofedto support XAVC 10-bit HD422 recordings.XAVC enables a really wide variety of operational possibilities for content material production, notably: From Proxy to 4K pixel resolutions, intra frame and lengthy GOP schemes, and 1080 50P/60P infrastructure capability. When you try to import Sony PMW-400 recordings to FCP 7 for further editing, you will encounter problems:“Can anyone tell me how can I import Sony PMW-400 XAVC footages to FCP 7 for editing? I record some videos with the PMW-400, but it seems that FCP 7 does not support the footages.”Solution: Till now, FCP 7 cannot edit Sony PMW-400 XAVC files directly. If you need to edit Sony PMW-400 XAVC footages in FCP 7 losslessly, you have to convert XAVC to FCP compatible ProRes .mov formats in advance.To do this conversion, Pavtube HD Video Converter for Mac (review) is highly recommended. This program can easily handle XAVC to ProRes 422 conversion with excellent output video quality at ultrafast converting speed. Other Download:- Pavtube old official address: http://www.pavtube.com/hd-video-converter-mac/- Amazon Store Download: http://www.amazon.com/Pavtube-Video-Converter-Mac-Download/dp/B00QI9GNZS- AppStore Download: https://itunes.apple.com/de/app/pavtube-hd-video-converter/id502792488?mt=12- Cnet Download: http://download.cnet.com/Pavtube-HD-Video-Converter/3000-2194_4-76177786.htmlNow, follow the guide below to transcode Sony PMW-400 XAVC footage to ProRes MOV in details.Step 1: Launch the HD Video Converter on your Mac, and then click the “Add video” button to import your XAVC videos from Sony PMW-400 directly. In order to import several files at one time, you can click “Add from folder” button.Step 2: Click the “Format” bar to get the drop-down menu and you can get “Final Cut Pro>>Apple ProRes codec”, including ProRes 422, ProRes 422 (HQ), ProRes 422 (LT), ProRes 422 (Proxy) and ProRes 4444. Choose the proper one you want.Step 3: Press the “Settings” icon and you’d better set the video frame rate as 30fps, video size as 1920*1080 for editing Sony PMW-400 XAVC in FCP 7 easily.Step 4: Now, click "Convert" and let it go. The XAVC to FCP 7 Converter for Mac supports batch conversion. So if you have lots of XAVC videos to convert, check “Shut down computer after conversion” and you can go away without keeping an eye on it.Conclusion: Once the conversion process shows in 100%, click “Open” to get the output videos. Create a project and start Sony PMW-400 editing XAVC videos in FCP 7 with light speed.Source: http://digitalmediasolution.altervista.org/blog/import-sony-pmw-400-xavc-to-fcp-7/Further Reading:
Summary: Wanna import Sony HDR-CX440 XAVC S to FCP X? This guide will teach you how to get HDR-CX440 XAVC S videos editable in FCP X without any issue.
 The Sony HDR-CX440 HD Handycam, with 8GB Internal Memory features an Exmor R CMOS sensor and a wide-angle Carl Zeiss zoom lens with 30x optical zoom. The Sony HDR-CX440 captures Full HD 1920*1080 video at 60p and 9.2MP still images to its 8GB of internal memory or to optional media cards. The Sony CX440 records using XAVC S codec (up to 50 Mb/s) and features dual recording, which lets you simultaneously capture both high-quality AVCHD and web-optimized MP4 files.You may have got the Sony HDR-CX440 camera, recorded some full-HD footages in XAVC S format, and wanted to import the XAVC S recordings to FCP X for editing. But you will encountered problems when importing Sony CX440 XAVC S files to FCP X. Why the problems occur? Sony XAVC S is the latest high definition format introduced by Sony–is not supported by Final Cut Pro so far. To import Sony HDR-CX440 XAVC S videos to FCP X for editing without issues, the best solution is to convert Sony CX440 XAVC S to FCP X supported format.Some main files formats recommended for Final Cut Pro:Video Formats: Apple Animation codec, Apple Intermediate codec, Apple ProRes(all versions), AVC-intra, AVCHD (including AVCCAM, AVCHD Lite, and NXCAM), DV (including DVCAM, DVCPRO, and DVCPRO50), DVCPRO HD, H.264, HDV, iFrame, Motion JPEG(OpenDML only), MPEG IMX(D-10), REDCODE RAW (R3D), Uncompressed 10-bit 4:2:2, Uncompressed 8-bit 4:2:2, XAVC, XDCAM HD/EX/HD422, QuickTime formats.Audio Formats: AAC, AIFF, BWF, CAF, MP3, MP4, WAVContainer format: 3GP, AVI, MP4, MXF, QuickTimeStill-image formats: BMP, GIF, JPEG, PNG, PSD, RAW, TGA, TIFFSince, Apple ProRes is the most compatible codec for FCP X, so if we want to edit Sony HDR-CX440 XAVC S in FCP X, it is necessary to convert those already shot XAVC S files to ProRes .mov using third-party software. Here, you can depend on Pavtube HD Video Converter for Mac (review). With this best program, besides FCP X, it can also export DNxHD for Avid MC, MPEG-2 for Adobe Premiere Pro, AIC for iMovie and more for native editing. Other Download:- Pavtube old official address: http://www.pavtube.com/hd-video-converter-mac/- Amazon Store Download: http://www.amazon.com/Pavtube-Video-Converter-Mac-Download/dp/B00QI9GNZS- AppStore Download: https://itunes.apple.com/de/app/pavtube-hd-video-converter/id502792488?mt=12- Cnet Download: http://download.cnet.com/Pavtube-HD-Video-Converter/3000-2194_4-76177786.htmlHow to work with Sony HDR-CX440 XAVC S videos in FCP X?Step 1: Launch the HD Video Converter on your Mac, and then click the “Add video” button to import your XAVC S videos from Sony HDR-CX440 directly. In order to import several files at one time, you can click “Add from folder” button.Step 2: Click the “Format” bar to get the drop-down menu and you can get “Final Cut Pro>>Apple ProRes codec”, including ProRes 422, ProRes 422 (HQ), ProRes 422 (LT), ProRes 422 (Proxy) and ProRes 4444. Choose the proper one you want. Here, we suggest you to choose Apple ProRes 422 .mov as the best output format.Step 3: Press the “Settings” icon and you’d better set the video frame rate as 30fps, video size as 1920*1080 for editing Sony CX440 XAVC S in FCP X easily.Step 4: Now, click "Convert" and let it go. The XAVC S to FCP X Converter for Mac supports batch conversion. So if you have lots of XAVC S videos to convert, check “Shut down computer after conversion” and you can go away without keeping an eye on it.Conclusion: Once the conversion process shows in 100%, click “Open” to get the output videos. Create a project and start Sony HDR-CX440 editing XAVC S videos in FCP X with light speed.