“It's a common situation that people can't import Sony PXW-X200 XAVC to Final Cut Pro X successfully. For instance, FCP X only recognizes the image in the loaded XAVC video; it will grey out the import window or even crashes suddenly. Here're two ways to import Sony XAVC to FCP X: 1. You need to install the Sony XAVC/XDCAM Plug-in for FCP X on your system; 2. You can transcode Sony XAVC to FCP X supported Apple ProRes format for editing without rendering on Mac.” Hot search: FCP X Formats | Best 10 HD Video Converter Review | XAVC to Xbox One/360 | XAVC to QuickTime | XAVC MXF to Vegas Pro 13Why we love Sony PXW-X200 camcorder so much?Offering the ultimate flexibility, the new Sony PXW-X200 offers pristine Full HD (1920*1080) recordings in the latest generation XAVC codec for broadcast quality 10-bit 4:2:2 sampling utilizing the MPEG-4 XAVC/H.264 compression for maximum quality. In other words, this kind of camera has the strong ability for shooting flexible videos with a high quality.What a pity! The latest high definition XAVC video format introduced by Sony PXW-X200 is not well supported by Final Cut Pro X so far. According to Apple official and XAVC users feedback, we offer two ways to import Sony PXW-X200 XAVC video to Final Cut Por X on Mac OS X, including the latest Yosemite or El Capitan.Method one: Sony XAVC Plug-in for Apple Final Cut Pro X1.If you use Final Cut Pro X version 10.2: Final Cut Pro X 10.2 supports Sony XAVC, XAVC S, XDCAM, XDCAM HD, and XDCAM EX media.Before importing Sony XAVC, verify that Pro Video Formats is installed on your system. Check for software updates and, if necessary, install the latest Pro Video Formats. (You can also manually download Pro Video Formats from the Apple Support website.) No additional software is required.2.If you use Final Cut Pro X version 10.1.4 or earlier: Final Cut Pro X 10.1.4 and earlier support Sony XAVC, XDCAM, XDCAM HD, and XDCAM EX media.Note: If you want to import Sony XAVC S media, update to Final Cut Pro X 10.2.Before importing Sony XAVC and XDCAM media, verify that Pro Video Formats and the Sony XAVC/XDCAM Plug-in for Apple are installed on your system. Check for software updates and, if necessary, install the latest Pro Video Formats. (You can also manually download Pro Video Formats from the Apple Support website.)If you need to install the Sony plug-in, manually download it from the Sony Creative Software Download page. Review the included release notes, and then install the Sony plug-in.Method two: Transcode Sony PXW-X200 XAVC files to FCP X supported Apple ProResThis is a simple and effective method: convert PXW-X200 XAVC to FCP X format with professional software at one go. By converting the video beforehand, you can import XAVC to FCP X for editing immediately.Pavtube HD Video Converter for Mac (review) is a yet fast and effective XAVC to FCP X converter for Mac OS X, El Capitan, Yosemite, Mavericks, Montain Lion included. Preconfigured with FCP X profile and high quality engine, this full-featured Mac XAVC to FCP X converter will enable both novice users and advanced users to convert Sony XAVC to FCP X supported format and import XAVC to FCP X with only a few mouse clicks, while retaining excellent video and audio quality for editing in FCP X. After the fast video conversion ends, you can import the converted XAVC video to FCP X directly without rendering and edit Sony XAVC in FCP X to create your own video clip. More, Pavtube HD Video Converter for Mac can also convert XAVC to MPEG-2 for Premiere or convert XAVC to DNxHD .mov for Avid. Would you like to have a try?
 Other Download:- Pavtube old official address: http://www.pavtube.com/hd-video-converter-mac/- Amazon Store Download: http://www.amazon.com/Pavtube-Video-Converter-Mac-Download/dp/B00QI9GNZS- AppStore Download: https://itunes.apple.com/de/app/pavtube-hd-video-converter/id502792488?mt=12- Cnet Download: http://download.cnet.com/Pavtube-HD-Video-Converter/3000-2194_4-76177786.htmlA detailed guide is offered here for your reference:Step 1: Install this program and launch it according to its instructions. With two buttons we can easily transfer our original files in, "Add video" and "Add from folder" can do this job well. The how could we get the suitable ones for FCP, Premiere and Avid? Now, follow the screen shots below, we have individual output choices for each one.
 Step 2: For Final Cut Pro, may be the "Final Cut Pro>>Apple ProRes 422 (*.mov)" on the output list could be your best, right? The XAVC to FCP X Converter for Mac have different selection there so if you cannot find them out. Just tap the answer in the searching box, you won't miss it there.
 Step 3: Then we can go to other optional items to take around, such as the "Settings" there. Many users are fond of this button because we can adjust our own output videos here. For example, the video size, bitrates, or even the audio channels. Anything we can make a selections here for output devices or apps.Step 4: Finally, just tap the "Convert" button, the software can easily get the output Apple ProRes mov files.Conclusion: At the end of this paper, if you are the first time to work with FCP X, Premiere Pro and Avid, Pavtube also can offer you some related transferring guides individually for FCP, Premiere and Avid, you can take as references.Further Reading:
“As a professional camcorder shooter, I’m going to edit some XAVC recordings from Sony XDCAM PXW-X180, ‘unknown errors’ happened when I import my XAVC to FCP X for editing. Should I need to convert the XAVC to ProRes MOV as we all know?” Follow the questions mentioned above, we are going to solve the issues that how to easily edit XAVC in FCP without trouble.
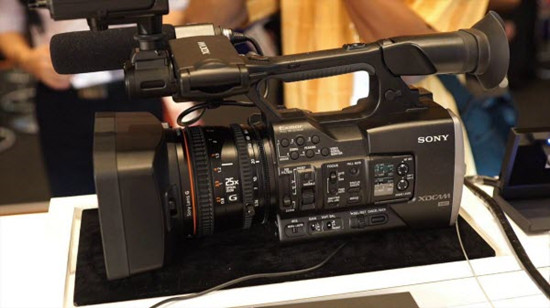 As one of the best editing tools on Mac, FCP indeed has the good ability of editing all video and audio parameters. With the best formats FCP supported, in order to import the Sony PXW-180 XAVC footage to FCP X, why not try to transcode your XAVC to ProRes MOV with a professional XAVC encoder/decoder? Let’s get more details below.Hot Search: Sony AX-1 4K XAVC to FCP | Sony PXW-X70 to FCP | Song PMW-F55 XAVC to FCPPart 1. Get Sony XAVC/XDCAM Plug-in for Final Cut Pro XThis this Sony Camera Import Plug-in that provides support for XDCAM / XDCAM EX / XAVC files shot on Sony SxS card, allowing viewing and editing capability in Final Cut Pro X. This is the latest plugin for FCP X, added support for XAVC (4K & HD) files.Free Download: XAVC/XDCAM Plug-in for Apple (PDZK-LT2) Mac OS, Version 1.1.0, 12.4MBNote: This plug-in requires: Final Cut Pro X 10.0.6 or higher for XDCAM format Final Cut Pro X 10.0.8 or higher for XAVC formatThis plug-in supports Sony SxS Card but not Professional Disc.Part 2. Import Sony XDCAM PXW-X180 XDCAM MXF/XAVC files to Final Cut Pro X without plugin (Recommend)Then what is the best Sony XDCAM Converter to deal with my XAVC/MXF codec? I searched on the web and find an easy-to-use yet professional software called Pavtube HD Video Converter for Mac (review), which offers the best way to edit Sony XDCAM PXW-X180 video in FCP X smoothly by effortlessly and flawlessly transcoding XAVC/MXF footage to FCP native ProRes MOV format. It is safe to install and easy to use. Below will show you Sony XDCAM PXW-X180 XAVC/MXF importing and editing workflow in FCP X in details.
 Other Download:- Pavtube old official address: http://www.pavtube.com/hd-video-converter-mac/- Amazon Store Download: http://www.amazon.com/Pavtube-Video-Converter-Mac-Download/dp/B00QI9GNZS- AppStore Download: https://itunes.apple.com/de/app/pavtube-hd-video-converter/id502792488?mt=12- Cnet Download: http://download.cnet.com/Pavtube-HD-Video-Converter/3000-2194_4-76177786.htmlConvert Sony XDCAM PXW-X180 XAVC/MXF to Final Cut Pro X for editing smoothly with Apple ProRes:Step 1: Load Sony PXW-X180 XAVC/MXF files to the ProRes Converter.Run Pavtube HD Video Converter for Mac. Drag and drop the PXW-X180 XAVC/MXF files to the Converter. You can also hit “Add Video” button to import videos to the app.
 Step 2: Click “Format” bar to choose output format for use in FCP X.Choose “Final Cut Pro>>Apple ProRes 422 (*.mov)” as best video format for editing Sony PXW-X180 XAVC/MXF in Final Cut Pro X as well as good video quality.
 Step 3: Start transcoding.Click “Convert” button to start the conversion from Sony PXW-X180 XAVC/MXF footage to FCP Apple ProRes MOV on Mac OS.Conclusion: After the workflow, you can go to the output folder to find the converted video files. Now you are free to transfer Sony PXW-X180 XAVC/MXF videos in Final Cut Pro X under Mac without problems.Additional Tips:1.Before you try to do the conversion, if you are also a FCP X user, please make sure that you have installed the Apple ProRes Codec manually since the FCP X asks users to install it by themselves.2.You can click “Settings” button in the main interface to customize the output video’s parameters, such as resolution, frame rate, etc.3.If you want to edit Sony XAVC/MXF video in iMovie, you just need to choose the “iMovie and Final Cut Express>>Apple InterMediate Codec (AIC) (*.mov)” in the second step.XDCAM Professional users can use Pavtube HD Video Converter for Mac in Part II to ingest material into Apple ProRes for Final Cut Pro X, it will help save the rending time. It will also help you easily edit Sony HD Video recordings in iMovie/FCE, Avid, Premiere Pro for editing.Further Reading:
“A problem arose when I tried to import XAVC S files into FCP 7. It won’t work… at all. I’ve done some tests looking for a (free) conversion software for XAVC-S to QuickTime .mov. I tried some native Mac apps like Compressor, MPEG Streamclip, and Toast. None worked”Have you guys ever met the issues when editing or playing your 4K XAVC files there? Do you get any best XAVC video assistants to help us a lot in converting XAVC files to other common ones like MOV, MP4, AVI, MPG, WMV, FLV, SWF, etc for editing or playback? Consequently, for native importation of Sony 4K XAVC-S videos, it is highly advisable to first convert XAVC/XAVC-S video format to Mac with appropriate codec. What’s the best XAVC S file converter for Mac?1.FFmpeg should be able to remux from XAVC-S .mp4 to .mov with no transcoding necessary. I’ve tried yet, it imports my XAVC-S videos, but it takes more time than its worth. I’d gave up the way.2.To make it clearly for us to work with 4K XAVC files, Pavtube Video Converter for Mac (review) can be the best XAVC converting program, which can help you transcode Sony XAVC or XAVC-S to any other common video formats with the high quality preserved, such as MOV, MP4, AVI, MPG, WMV, FLV, SWF, etc. What’s more, with so many various editing tools offered, it is popular for those video editors.
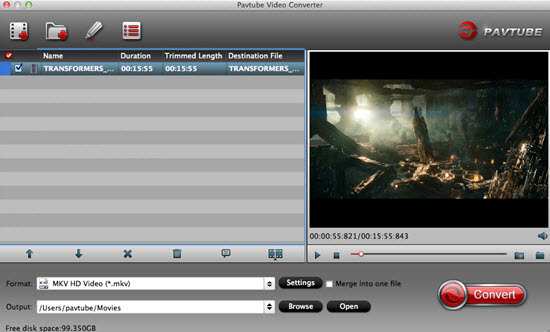
 Other Download:- Pavtube old official address: http://www.pavtube.com/video-converter-mac/- Amazon Store Download: http://www.amazon.com/Pavtube-Video-Converter-Mac-Download/dp/B00QIBK0TQ- Cnet Download: http://download.cnet.com/Pavtube-Video-Converter/3000-2194_4-76179460.htmlGuide on transcoding Sony 4K XAVC files to common ones for editing, playing, etc:Step 1: Install the program on Mac and run it. Drag the XAVC/XAVC S files to the software. Or you can also click “Add Video” button on the top of the main interface to import video to the program.
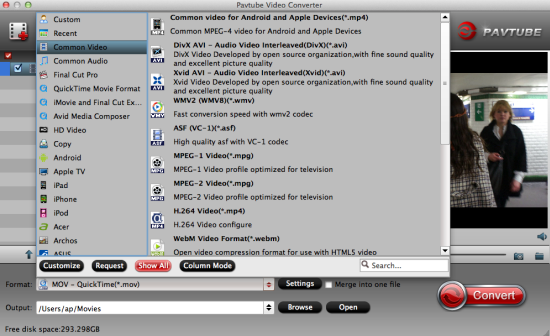
 Step 2: Come to the output list, here we would like to suggest you to come to the output list to select the “Common Video” to find the items you want. So many output common ones are here for your choosing. Or for NLEs, just drop down the list to find more.
 Step 3: Click “Settings” button; you can adjust video and audio settings, including codec, aspect ratio, bit rate, frame rate, sample rate, and audio channel.Step 4: Then we will come to the final step, on the main interface if you have done all the preparation work, why not hit the “Convert” button to get your job started?Conclusion: With a faster conversion speed and easy operation, you won’t worry about your 4K XAVC recordings any more.Further Reading:
Summary: Are you troubled with how to downsize Sony 4K XAVC to 1080p for playing smoothly? In order to make 4K XAVC files accepted by media players on Windows/Mac, how about join us to follow the tutorial?
 “I have footage that was colored at 4K HD, but my final output will be 1080p. I need to bring my 4K QT into Premiere Pro and add my subtitles, credits, etc and output to 1080p. Then it would be easier for me to enjoy 4K XAVC on MX player.”What is the difference between 1080p and 4K resolution?A High Definition TV with 1080p resolution is composed of two million pixels (1920*1080), while a 4K TV (aka Ultra High Definition) has over eight million pixels (3840*2160). Therefore, 4K has around four times more resolution than 1080p and produces a clearer picture.Best solutions to downscale 4K XAVC to 1080p for watching:Here, you must have got the questions on how to play 4K XAVC files smoothly there, right? In my opinion, the best way to downsize 4K HD to 1080p for Premiere Pro is to first convert 4K XAVC to 1080p and play them in 1080p output. In this way, we need a professional 4K XAVC to 1080p video converter. Fortunately, Pavtube Video Converter (Mac version) has the ability to downscale the 4K XAVC to 1080p well. Let’s learn some conversion steps here.
 Other Download:- Pavtube old official address: http://www.pavtube.com/video_converter/- Amazon Download: http://download.cnet.com/Pavtube-Video-Converter/3000-2194_4-75734821.html- Cnet Download: http://download.cnet.com/Pavtube-Video-Converter/3000-2194_4-75734821.htmlHow to downsize Sony 4K XAVC to 1080p for playing smoothly?Step 1: Launch the 4K to 1080p Converter; click “Add Video” and load your 4K HD files. This program supports batch conversion, so you can add multiple files into it at a time.
 Step 2: Click the “Format” drop down list to select MP4, MOV, MKV, AVI, etc format from “Common Video” as you want. Since this video converter also provides optimal profiles for kinds of editing programs and media devices, you can also select a proper format that best meets your needs. For editing in Premiere Pro, you’d better choose “Adobe Premiere/Sony Vegas>>MPEG-2 (*.mpg)”.
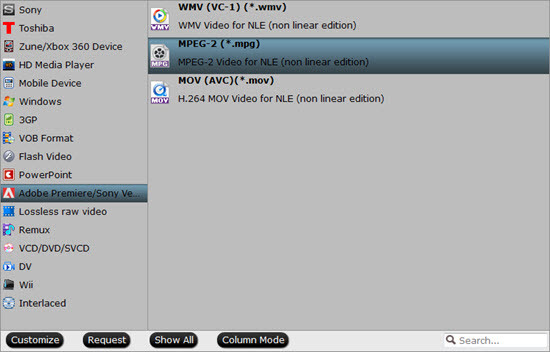 Step 3: Click “Settings” button; you can adjust video and audio settings, including codec, aspect ratio, bit rate, frame rate, sample rate, and audio channel. To down-convert ultra HD 4K to 1080p, do remember adjusting video size to 1920*1080. That is the exact 1080p.Step 4: At the end, hit “Convert” button to let the 4K HD to 1080p conversion begin.Conclusion: When the conversion finished, check the generated 1080p video, you will certainly be satisfied with its final video quality. It would be easier for you to playback and edit.Further Reading:
You cannot get rid of the trouble when importing your XAVC S MP4 recordings to Avid Media Composer which shot from Sony a7 II camera? If so, you may wish to read this post. It explains an easy to convert Sony a7 II XAVC S video for editing in Avid with good quality. From XAVC S MP4 to DNxHD MOV, you are supposed to get a XAVC to Avid Converter that can do this work well.
 Issues when importing Sony a7II XAVC files to Avid Media Composer:“Hi, I’m trying to import video recordings from the new Sony a7 II to Avid MC6. The camera uses a flavor of MP4 that is called XAVC-S. I have tried the traditional importing method, but there’s no go. I have also tried the AMA plug-in created by Sony, unfortunately, it doesn’t seem to support Sony a7 II XAVC-S footage. Does that mean I have to use 3rd party software to convert formats? If so, does anyone know of a good XAVC-S Converter that is worth trying?”Relationship between XAVC S files and NLEs (Example: Avid MC):Since the XAVC S footage is a peripheral non-standard format which is not supported by Avid Media Composer, Some other NLEs are not suitable too, such as FCP, Sony Vegas etc. In order to import Sony Alpha a7II XAVC S footage into Avid for smoothly editing, we can render to the famous third-party software Pavtube XAVC S to Avid MC Converter for Mac to help us to convert XAVC to DNxHD .mov.Tips: For those Windows users, Windows XAVC Converter is also allowed here. What I need to mention is with the upgraded version 4.8.6.2, this windows product can support the latest video codec H.265/HEVC well. Besides, it supports encoding to M3U8. Do you wanna a try?
 Other Download:- Pavtube old official address: http://www.pavtube.com/hd-video-converter-mac/- Amazon Store Download: http://www.amazon.com/Pavtube-Video-Converter-Mac-Download/dp/B00QI9GNZS- AppStore Download: https://itunes.apple.com/de/app/pavtube-hd-video-converter/id502792488?mt=12- Cnet Download: http://download.cnet.com/Pavtube-HD-Video-Converter/3000-2194_4-76177786.htmlGuide: How to convert XAVC S to DNxHD MOV for editing in Avid MC?Step 1: Start up HD Video Converter as a professional Sony a7 II XAVC S MP4 Converter. When its main interface pops up, click “Add Video” to input your source media with individual clips or in a complete folder.
 Step 2: Click the “Format” bar to get the drop-down menu and you can get “Avid Media Composer”. Choose “Avid DNxHD (*.mov)” as output format.
 Step 3: If necessary, you can click “Settings” button and go to “Profiles Settings” panel to modify video and audio settings like video encoder, resolution, video bit rate, frame rate, aspect ratio, audio encoder, sample rate, audio bit rate, and audio channels. 3D settings are also available.Step 4: Then we are going to come to the final step, click the “Convert” button on the main interface and start out job.Conclusion: If you are the first time to work with this Avid MC, some related tips you can take a reference in this transferring article. What’s more, this third-party can hold almost all formats for editing in various popular editing tools, that’s why it has a good reputation online.Further Reading:
Summary: Today’s lesson topic: Further understanding of Sony FS XAVC files and the best workflow to make FS7 XAVC recordings accepted by FCP 7 nicely on Yosemite/Mavericks.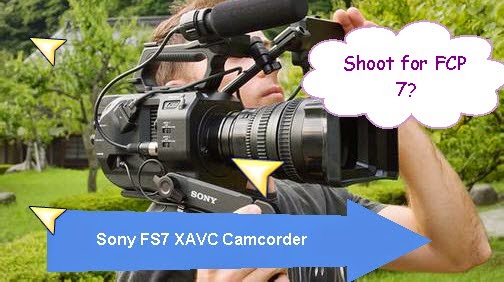 Before we start the discussion topic in this page, let me give you the example to show you the related issues and cause why we need to convert our Sony FS7 XAVC to ProRes MOV as the easiest way to edit in FCP 7. In order to go through such similar issues, a professional XAVC to FCP 7 converting tool can be allowed in the following article. Let’s listen carefully.Problems we may meet when importing Sony XAVC to FCP 7:“I have recorded some video clips with the Sony FS7 professional camcorder, the files are stored in XAVC format and with the resolution of 4096 * 2160, the videos are perfect, however, it seems pretty hard to edit such high definition videos on Mac FCP 7 for I cannot even open the files in the Final Cut Pro 7. It seems that XAVC files cannot be accepted by Adobe Premiere Pro, right? So any good suggestions? Thanks in advance.”Expand knowledge of Sony FS7 camcorder:The PXW-FS7 XDCAM camera has an ergonomic grip design for easy handling and operability. The PXW-FS7 features a 4K Super 35mm Exmor CMOS sensor and support for shooting in 4K** 60p or Full HD at high frame rates up to 180 fps (frames per second). Selectable recording formats include XAVC, which supports 4K* 60p, Full HD 60p even in 4:2:2 10-bit recording, as well as the common MPEG-2 HD 422 format used by many broadcast stations around the world.Pavtube XAVC to FCP Converter for Mac---Efficient way to edit our XAVC files in FCP 7.To ensure users have the most comprehensive Ultra-HD 4K video editing experience, more and more video editing programs provide compatibility of XAVC and Sony itself also generates plug-ins. However, not all the plug-ins can be available with Sony XAVC footage to FCP. Here, have you heard of the Pavtube Video Converter for Mac, which is the professional that can handle all various videos in NELs for Mac users. Also, Windows version is offered here. Additionally, as soon as the upgraded windows version, this program can support the H.265/HEVC videos encode and decode nicely. Any interests in this H.265 encoder/decoder?
 Other Download:- Pavtube old official address: http://www.pavtube.com/video-converter-mac/- Amazon Store Download: http://www.amazon.com/Pavtube-Video-Converter-Mac-Download/dp/B00QIBK0TQ- Cnet Download: http://download.cnet.com/Pavtube-Video-Converter/3000-2194_4-76179460.htmlDetails on how to convert Sony FS7 XAVC to ProRes MOV for FCP 7 on Yosemite/Mavericks:Step 1: Install and run the XAVC Video Converter on your Mac, then run it. Click on "Add", and browse your files; select all the XAVC files you wanna convert. If you want to combine all the files together for easy importing to FCP, please tick the box "Merge into one" on the main interface.
 Step 2: Click on Format, and from the dropdown menu, here I recommend “Final Cut Pro > Apple ProRes 422 (*.mov)” as the output format. Then you can set the output folder as you want.
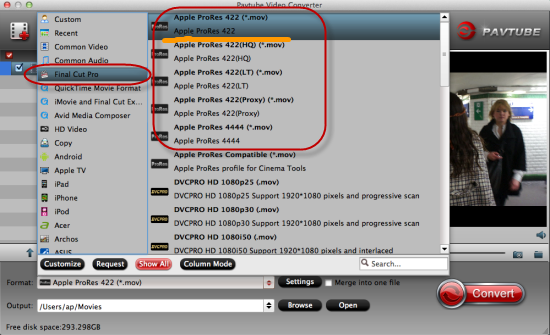 Notes: For other NELs? Such as iMovie, Adobe, FCE, Avid, etc? You just need to choose a proper video format like “iMovie and Final Cut Express -> Apple InterMediate Codec (AIC) (*.mov)” in the second step. For Avid Media Composer, choose “Avid Media Composer > Avid DNxHD(*.mov)” as output; For Adobe Premiere Pro, choose Adobe Premiere/Sony Vegas> MPEG-2(*.mpg) as output.Step 3: Click the "Settings" button and customize proper video/audio parameters including Video size, bitrate and fame rate and mroe. Usually 1920*1080 video size and 30fps video frame rate are recommended for FCP editing. Well, if you prefer to work with 4K video, you can adjust video size to get 4K ProRes for FCP.Finally, go back to the main interface, hit the “Convert” button there, we easily start our conversion work. Next, transfer XVAC files to FCP 7 according to the “Open file”>>…, we can enjoy our editing our files in FCP 7.Source: http://mediaconverting.blogspot.com/2015/01/workflow-of-fs7-xavc-to-fcp-7.htmlFurther Reading:
Summary: Does Premiere Pro have native support for Sony AX-100 4K XAVC S files? If you are trying to import 4K XAVC S to Premiere Pro for editing, you may wish to read this post.
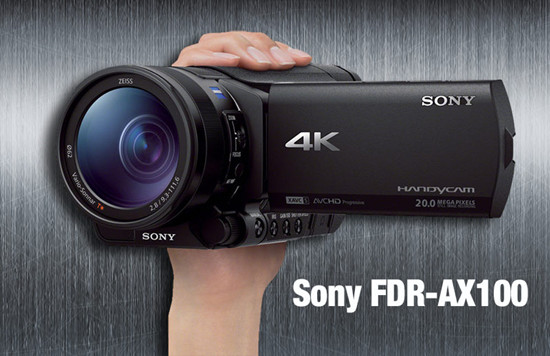 The Sony AX-100 camcorder records 4K and HD movies in XAVC S, a consumer friendly format based on the XAVC codec developed for 4K/HD and professional use, which uses MPEG-4 AVC/H.264 for video compression and linear PCM for audio compression, while saving files in a MP4 wrapper. However, if you want to import the XAVC S videos from Sony AX-100 to Premiere Pro for editing, you may encounter incompatibility issues.“I can not get Premiere Pro CS6 to recognize the 4K XAVC S files from AX-100. I get the ‘generic error’ message all the time. is there a way to get it to work?”To be clear, Adobe Premiere Pro CS5, CS5.5, CS6 and the latest PPro CC don’t have native support for Sony XAVC S footage wrapped in MP4 recording format. If you are searching for a plug-in to help you open Sony AX-100 4K XAVC S video in Premiere Pro, the searching results may let you down, that’s because presently there is no such a kind of plug-ins available for viewing and editing XAVC S MP4 footage in Premiere Pro and other mainstream editing programs like Avid Media Composer, FCP X and Vegas Pro.Since XAVC S codec is a new one, and is not widely supported. For those who stick with Premiere Pro, a quick fix is to convert AX-100 4K XAVC S to Premiere editable format such as MPEG-2 before editing. Pavtube HD Video Converter for Mac is the solid tool to help users make the 4K XAVC S to Premiere Pro transcoding on Mac OS X Yosemite.
 How to convert Sony AX-100 4K XAVC S to Premiere Pro for editing?Step 1: Install and import AX-100 4K videos.Backup your 4K XAVC S videos from your AX-100 camcorder to hard drive. Install and launch 4K HD Video Converter for Mac. Drag and drop 4K video files to the software. You can import multiple files at once thanks to batch conversion.
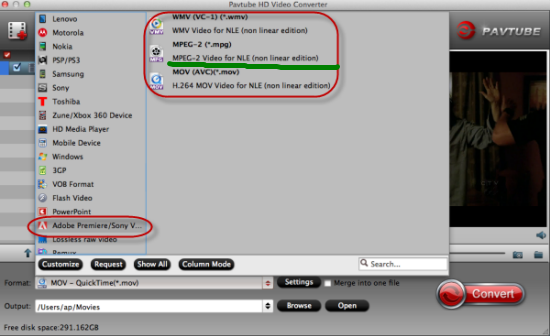
 Step 2: Set Premiere Pro friendly format.Click the drop-down list in the format line to get the format box. Then choose “Adobe Premiere/Sony Vegas>>MPEG-2 (*.mpg)” as output format.Tips: WMV (VC-1) (*.wmv) and MOV (AVC) (*.mov) are both supported. Generally, MPEG-2 is a well-accepted file format for its ability to keep up the video quality and its popularity.
 Step 3: Do some simple edit work.De-interlace: By default the 4K HD Video Converter for Mac will apply de-interlacing facility to some clips that are interlaced. Just click “Edit” to enter the video editor, switch to “Effect” tab, and check the “Deinterlacing” box.Trim: Basically, video hosting sites restrict video clips to be in certain file size and length. For example, YouTube stated that “videos can be up to 2GB in size and 10 minutes long”. You can trim the video to desired length with this HD Video Converter for Mac. Simply click “Edit” menu>>”Trim” tab and set start and end time point.Merge: To join multiple videos together, just select them in file list, and tick off the checkbox “Merge into one file” on the main interface.Step 4: Start to convert AX-100 4K XAVC S to Premiere friendly format.You can preview to check the final result. Once you are satisfied with it, click the “Convert” button to start converting AX-100 4K XAVC S to MPEG-2 .mpg format. It will take you a little while.Conclusion: After conversion, you’ll get no troubles in editing AX-100 4K XAVC S in Premiere Pro. Follow the steps and have a try!Further Reading:


